How to Backup iPhone – Back Up iPhone with iPhone Backup Software

It’s rather essential to back up your iPhone data regularly in case your device gets lost or damaged. Do wait until it’s too late.

As we all know, iTunes can backup and restore iPhone with ease, however, the backup files are unreadable, and if you want to restore with iTunes backup, you have to erase all the content and settings on your iPhone first, which may lead to the loss of data generated after the backup. In addition, iCloud is another iPhone backup choice, however, the free backup space is limited, iPhone erase is also required before the restore, and it will take rather long time to either backup iPhone or restore iPhone if the quantity of your files is large. The most important is that backing up iPhone data to iCloud is not that safe due to government surveillance programs or any other unknown data-collection or data-leak risks.

In this tutorial, I’ll introduce how to backup iPhone using 3 pieces of different iPhone backup software: iPhone PC Suite, iPhone Backup Extractor and MobileTrans.

How to Backup iPhone with iPhone PC Suite

iPhone PC Suite is a multifunctional iPhone data transfer software to backup iPhone, sync iPhone and move data between iPhone, iPad and iPod. With it, you can not only backup iPhone photos, text messages (SMS), MMS, iMessages, contacts, music (including ratings, play counts, skips, artworks and playlists), videos, movies, Podcast, iTunes U, TV shows, audiobooks and more to PC, Mac and iTunes, but also transfer the data already backed up back to iPhone or to other iOS devices. In addition, this iPhone backup software also enables you to convert videos and audio for your iPhone, remove duplicate contacts, and delete files in batch, etc.
To backup iPhone with iPhone PC Suite, please first download either iPhone PC Suite for Windows or Mac to your computer using the following buttons, and then install and launch it.

Free Download iPhone PC Suite for WindowsFree Download iPhone PC Suite for Mac

With the help of iPhone PC Suite, you are able to back up iPhone in 3 steps:
1. Connect your iPhone to the computer using the USB cable given to you in the box, and the iPhone backup software will automatically detect the device.
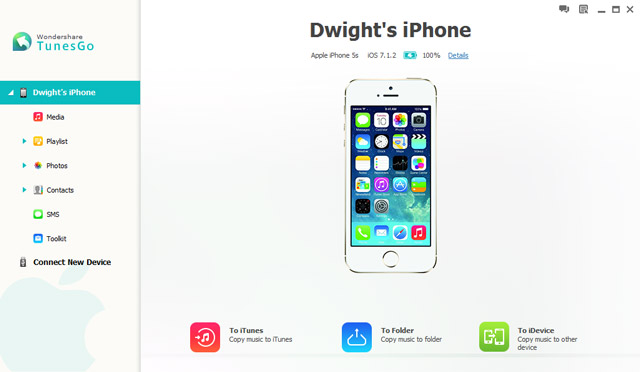
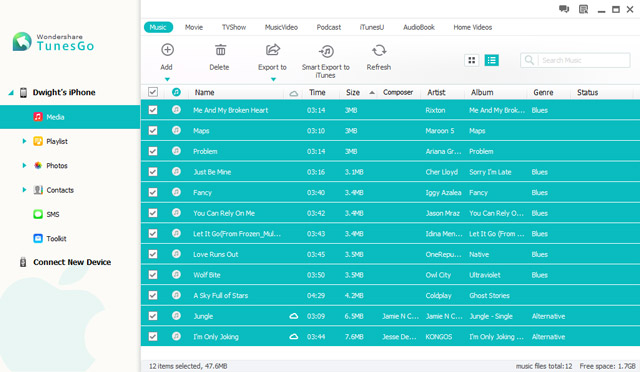
Connect iPhone to Computer
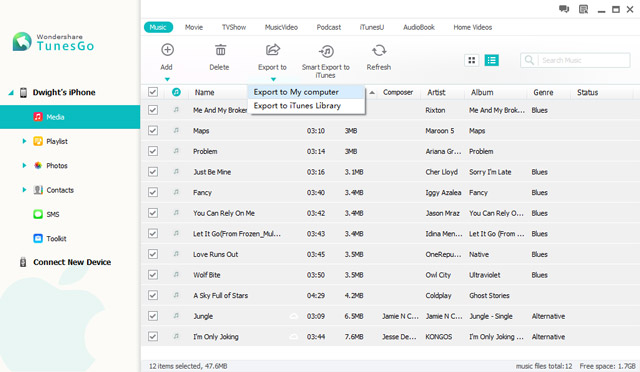
2. Highlight the file type that you want to back up to your computer on the left sidebar, select the data on the right panel;

Select iPhone data for backup
3. Click “Export to” > “Export to iTunes Library” or “Export to My Computer” on the top navigation menu to backup iPhone selected iPhone data to iTunes or the computer.

Backup iPhone
Tips:
1. Highlight the name of the iPhone on the left sidebar, and then click the “To iTunes” shortcut menu, you can easily backup all the media files (including music, movies, Podcast, iTunes U, TV Show, music videos, audiobooks, home videos and playlists) on the iPhone to iTunes Library.
2. Use the “Backup Contacts”, “Backup Photos” and “Backup SMS” shortcut menus of the “Toolkit”, you can backup iPhone contacts, photos and SMS to computer with only 1 click.
3. For contacts, you can back up the selected contacts or all the contacts “to a Single vCard File”, “to Multiple vCard Files”, “to CSV File”, “to Outlook Express”, “to Windows Address Book”, “to Windows Live Mail”, “to Outlook 2003/2007/2010/2013”; for SMS, you can back up the selected SMS or all the SMS “to HTML File”, “to TXT File”, or “to XML File”.

How to Back Up iPhone with iPhone Backup Extractor

iPhone Backup Extractor is a powerful iPhone data recovery tool to extract all kinds of data from iTunes and iCloud backup files, and scan the data on iPhone (including deleted items), then save to computer. Thus, with iPhone Backup Extractor, you can easily backup iPhone to PC or Mac. That’s to say, you are able to backup iPhone contacts, text messages (SMS), MMS, iMessages, notes, reminders, phone and FaceTime call history, calendar, WhatsApp chat history, Safari bookmarks, photos and pictures (in Camera Roll, Photo Stream and other apps), videos (in Camera Roll and other apps), voicemails, voice memos and app documents with the help of this iPhone data recovery software.
Please use the following buttons to download iPhone Backup Extractor for Windows and Mac.

Free Download iPhone Backup Extractor for WindowsFree Download iPhone Backup Extractor for Mac

Let’s see the steps to back up iPhone with iPhone Backup Extractor:
1. After installing and running iPhone Backup Extractor, connect your iPhone to the computer;
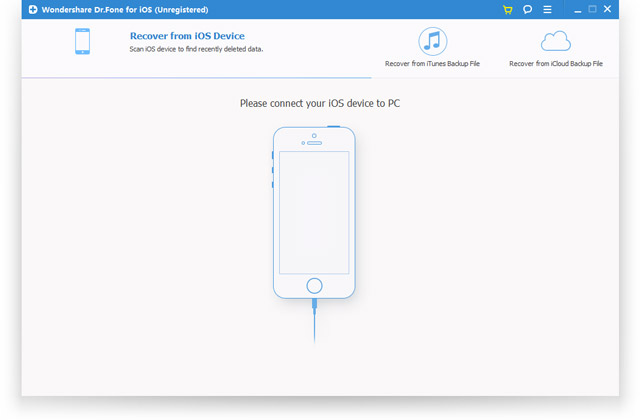
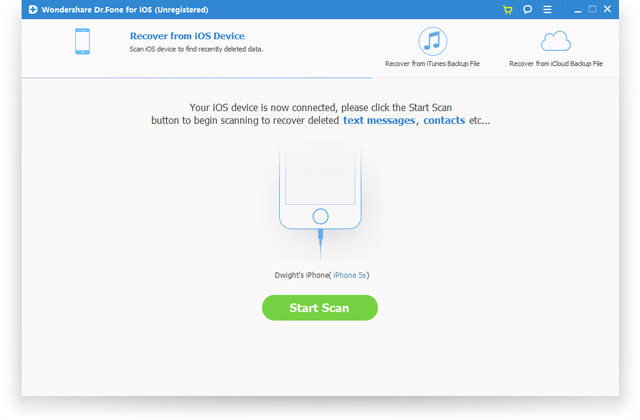
Connect iPhone to Computer
2. When the iPhone is connected, click “Start Scan” and the iPhone backup software will analyze your iPhone, then the data scan will be automatically started;

Start scan and analyze iPhone
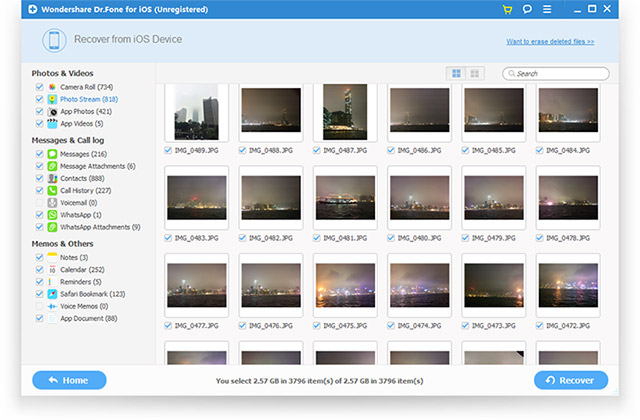
3. The files will be listed by category after the scan, preview and select the items that you want to back up to your computer, and then click the “Recover” button, the selected files will be backed up to your PC or Mac.

Back up iPhone

How to Backup iPhone with MobileTrans

MobileTrans is an all-in-one phone to phone transfer, phone backup software, phone restore tool and phone eraser that allows you to transfer data of up to 7 types between iPhone, iPad, iPod touch, Android and Nokia Symbian phones; extract files from Blackberry, iTunes and MobileTrans backups and transfer to iPhone, iPad, iPhone touch and Android phones; erase all the data on Android or iOS devices to keep personal data safe before selling or giving away the devices; backup iPhone, iPad, iPod touch and Android phone data to PC or Mac.
Here, I’ll introduce how to backup iPhone contacts, text messages, phones, music and videos to computer with only one click.
Before backing up iPhone using MobileTrans, download it using the following buttons, and then install and open it.

Free Download Phone to Phone Transfer MobileTrans for WindowsFree Download Phone to Phone Transfer MobileTrans for Mac

Just follow the steps:
1. Plug in your iPhone to the USB port of the computer;

2. Select “Back Up Your Phone” on the first interface of the software;
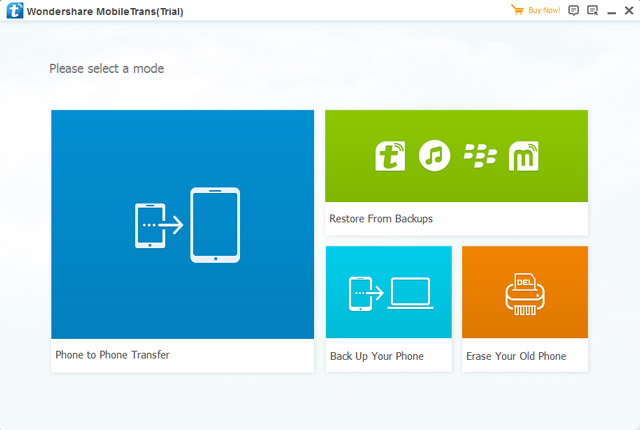
Select iPhone backup mode
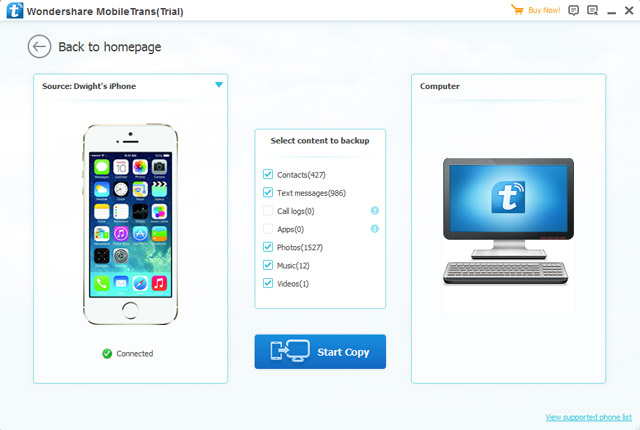
3. Make sure your iPhone is displayed on the left as the “Source”, tick the file types you want to back up to your computer in the center;

Backup iPhone
4. Click “Start Copy” to backup iPhone data to PC or Mac.

If you have any questions or suggestions about how to backup iPhone, please leave a comment below. Any ideas are welcome.

How to Erase iPhone – Erase Everything on iPhone Securely and Completely

If you want to sell, give away or release your used iPhone to others, the first thing you should do is to erase everything on iPhone completely to keep your personal information safe. When you buy a second-hand iPhone, you may need to erase all the content and settings on the iPhone before using it to avoid unnecessary troubles. If you have deleted some private data on your iPhone, you must want them to disappear permanently to prevent your secrets being revealed.

Apple have considered these situations and erasing iPhone is rather easy. In this tutorial, 5 ways to erase iPhone will be introduced:
1. Erase iPhone directly with your iPhone (FREE)
2. Erase iPhone using iTunes with iPhone connected (FREE)
3. Erase iPhone remotely with iCloud if your iPhone is lost or stolen (FREE)
4. Erase iPhone data completely and securely with SafeEraser
5. Erase deleted data on iPhone completely using SafeEraser

Method 1: Erase iPhone directly with your iPhone (FREE)

1. Make sure that you have backed up your iPhone with iTunes or iCloud, and the backups are up to date if you need to restore the iPhone later;
2. Tap “Settings” > “General” > “Reset” > “Erase all Content and Settings” on your iPhone.

Method 2: Erase iPhone using iTunes with iPhone connected (FREE)

1. Disable “Find My iPhone” in “Settings” > “iCloud” if you have turned it on;
2. Connect your iPhone to your computer and launch iTunes;
3. Select the iPhone when it is found by iTunes;
4. In the “Summary” tab, backup your iPhone with either iTunes or iCloud using the “Backup Now” button if you want to restore the iPhone again;
5. When the backup is finished. Click the “Restore iPhone…” button in the same panel and then hit “Restore” in the pop-up to erase all the content and settings on your iPhone.

Method 3: Erase iPhone remotely with iCloud if your iPhone is lost or stolen (FREE)

You are able to erase iPhone only if you had enabled “Find My iPhone” before it was lost;
1. Log in to https://www.icloud.com/#find with your Apple ID, then click “Find My iPhone”;
2. Click “All Devices” and choose the iPhone you want to erase after it is located;
3. In the iPhone’s Info window, click “Erase iPhone”;
4. Click “Erase” in the pop-up window;
5. Enter your Apple ID password;
6. Click “Next” and all the content and settings on your iPhone will be erased.

If your iPhone is running iOS 7 or later, you are allowed to input a phone number and a message to display on the iPhone after it’s erased.

The remote erase of your iPhone will start immediately if it’s online; if it is office currently, the iPhone remote erase will start the next time it’s online.

Note: After easing an iPhone, you cannot use “Find My iPhone” to locate it any more. So, it’s recommended to locate it or play a sound on it before you decide to erase it remotely.

All the 3 above methods provided by Apple are not 100% safe since iPhone “Restore” does not delete personal data and there are so many iPhone data recovery tools available. If you want to erase your iPhone securely and completely, download the professional iPhone eraser SafeEraser.

Free download iPhone eraser SafeEraser for Windows Free download iPhone eraser SafeEraser for Mac

SafeEraser is an easy-to-use but professional iPhone erase tool to erase all data (all the content and settings), only deleted data or just private data (Safari history, cookies, input history, search history and so on) on iPhone and overwrite the data with junk files using US Military specification over-writing technology to ensure the erased data is not recoverable. In addition, it also enables you to clean up iPhone data (such as log files, cached files, temp files and junk files) to free the storage space on your iPhone.

Method 4: Erase iPhone data completely and securely with SafeEraser

With this method, you can erase all the content and settings on your iPhone 4, iPhone 4S iPhone 5, iPhone 5s, iPhone 5c, iPhone 6, iPhone 6 Plus, iPod touch 4/5/6 and all iPad generations and restore the device to factory settings no matter whether the device is jailbroken or not, carrier-locked or not.

1. Connect your iPhone to your computer and launch SafeEraser;
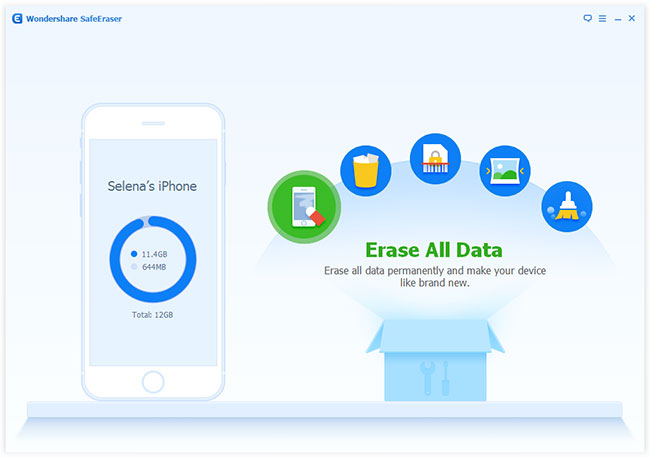
2. After the iPhone is found by the software, choose “Erase All Data” on the right;

Enter Erase all data interface

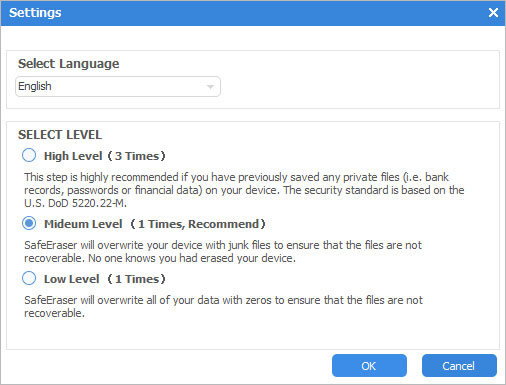
3. Click the link of “Security Level:” and change the “Security Level” as “High Level (3 Times)” in the “Settings” window;

Erase all data

Change Security Level

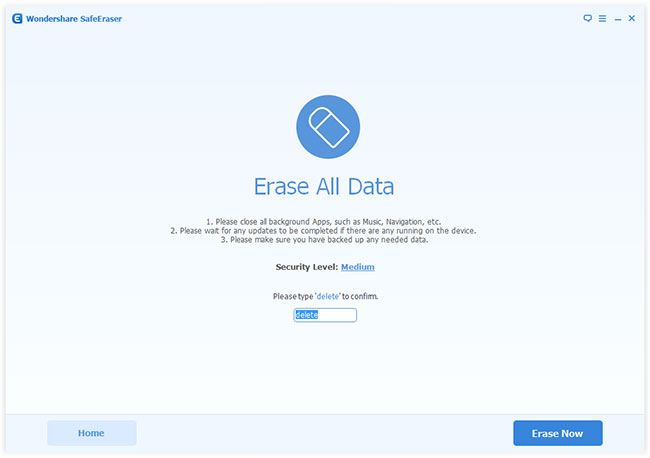
4. Input “delete” in the box to confirm the iPhone erase and click “Erase Now”, then the iPhone eraser will start to erase your iPhone.

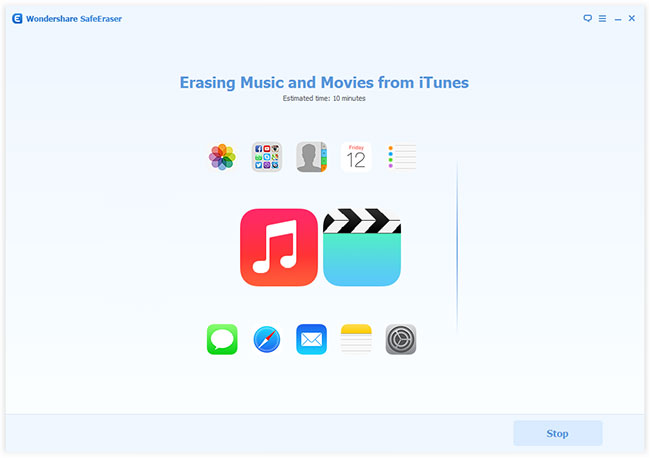
Erasing all data on iPhone

The “High (3 times)” Security Level uses the DoD 5220.22-M data sanitization standard originally defined by the US National Industrial Security Program (NISP) in the National Industrial Security Program Operating Manual (NISPOM). There is no possibility to recover the erased data on iPhone any more once the iPhone is erased with this method even if the government’s state-of-art data recovery technology is used.

Method 5: Erase deleted data on iPhone completely using SafeEraser

1. Get your iPhone connected with your computer using the USB cable came with the iPhone;
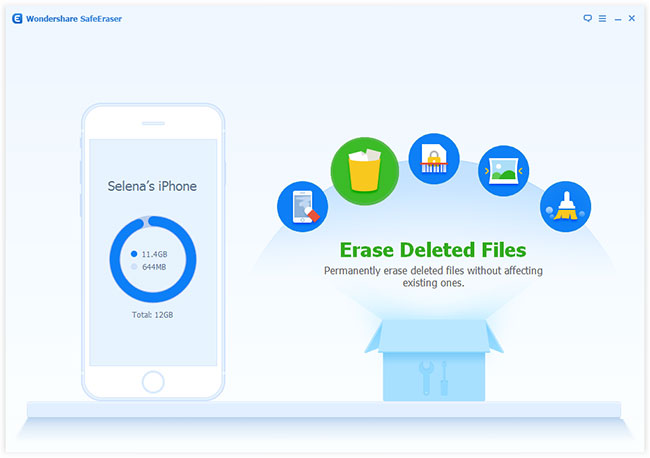
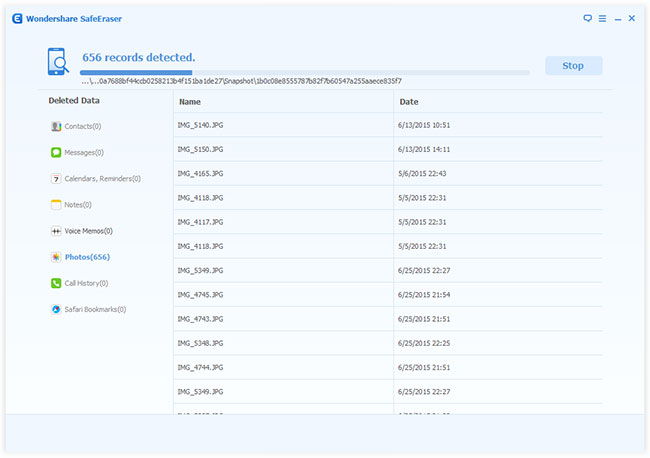
2. When the iPhone appears on the SafeEraser, select “Erase Deleted Files”;

Erase all deleted files on iPhone

3. The software will automatically start to analyze and scan the deleted data on your iPhone;

Analyze and scan deleted files on iPhone

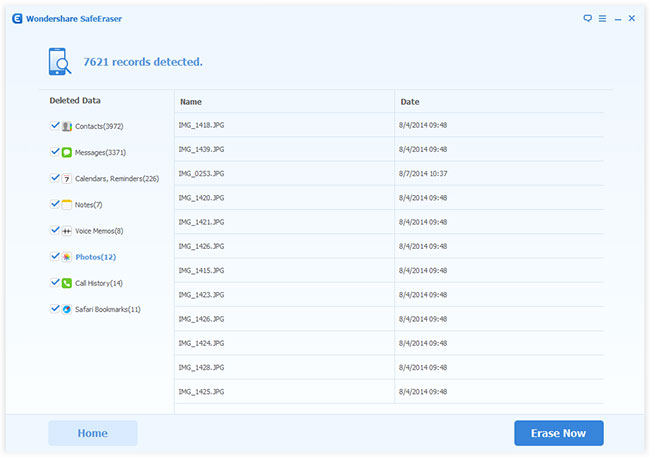
4. Preview the found data by categories after the scanning, unselect the file types you don’t want to erase from the iPhone and click “Erase Now”.

Select deleted files for erasure

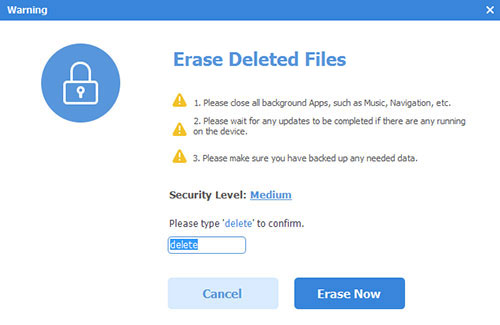
5. Select a “Security Level” and input “delete” in the box on the pop-up window to confirm the erasure, then hit “Erase Now” to start to wipe the deleted files on the iPhone.

Confirm iPhone erase

If you still want to restore your iPhone, please backup your iPhone with iTunes, iCloud or third-party iPhone backup software before the iPhone erase. The erase with SafeEraser is irreversible, so think it out with care before you make a decision.

How to Retrieve Deleted Notes on iPhone

Question 1 (from Apple Support Communities):
I took notes in my class using the app on my iPhone but a week later when I went back to the notes it was deleted and gone. I know it was on my phone because I looked over it after class. Is there any way to recover it? I looked on my icloud but there was nothing on there.

Question 2 (from ask.com):
Last night my iPhone randomly deleted all my notes–literally I had the app open one minute, and a few minutes later went back and everything was gone!! This has never happened before and I’ve had some notes in there for over a year. Does anyone know how/why this happened, and more importantly how to recover them?! I had a lot of important stuff in there!! TT__TT Thanks in advance!

Question 3 (from iOS forum):
I have my iPhone 5 which is recently upgraded to the iOS 6.1.3 and now by mistake I have deleted a note which is very important and now I have no idea what should be done to retrieve it back. Can someone please provide me the complete steps which I need to follow for the same? Thank you.

Question 4 (from Apple Support Communities):
How can I recover deleted notes from my iphone 4s. They were showing as dupilcates so I deleted one of them then both the original and the duplicate were deleted. How can I get them back.
iPhone 4S

Question 5 (from Apple Support Communities):
How can I recover deleted notes from my iphone 4s. They were showing as dupilcates so I deleted one of them then both the original and the duplicate were deleted. How can I get them back.
iPhone 4S

Question 6 (from Apple Support Communities):
Can you or how do you restore deleted notes ?

Question 7 (from Apple Support Communities):
Are you able recover deleted notes from your iphone/iPad?

Question 8 (from Apple Support Communities):
Since 4 days ago, suddenly I’ve missed almost all my notes, most of them, very important to me, maybe it happened after an Office for Mac actualization, particularly, an Outlook actualization.

I know that it is a common situation, can somebody help me?
Thanks in advance.
drmenchaca

Question 9 (from Apple Support Communities):
I accidently deleted a note from my iphone 5 is there any way to recover it from icloud?

Question 10 (from Apple Support Communities):
how can i recover my notes

Question 11 (from Apple Support Communities):
I accidentally deleted a note, can I recover it ?

Actually, there are 3 methods to retrieve deleted notes on iPhone:
1. Recover deleted iPhone notes from iCloud backup;
2. Restore notes from iPhone backup created previously by iTunes;
3. Use a third party iPhone note recovery software to get back the deleted notes.

If you have backed up your notes with iTunes or iCloud, follow the steps to restore from the backups.

If you don’t want the iTunes backup to overwrite all the current iPhone content and settings since the iTunes backup is not up to date, or you don’t have any iTunes or iCloud backup, download the following iPhone data recovery software.

Free download iPhone Backup Extractor for Windows Free download iPhone Backup Extractor for Mac

It’s easy to use the iPhone note recovery software:
If you want to extract notes from iPhone backup with the iPhone backup extractor: Select “Recover from iTunes Backup File”, then choose the backup that you want to recover the notes from. After the scanning, preview and select the notes that you want to recover, and click “Recover”.

If you have no backups and are using iPhone 3GS or iPhone 4: Connect your iPhone to the PC, and enter DFU mode following the graphic guides after the plugin is download. When the scan is finished, choose the notes you want and recover.

If you don’t have any backups and are using iPhone 4S or iPhone 5: Connect your iPhone to the computer, preview and recover the found notes after the scanning.

With the iPhone note recovery software, you’ll retrieve deleted notes on iPhone easily.